D I [WHY]
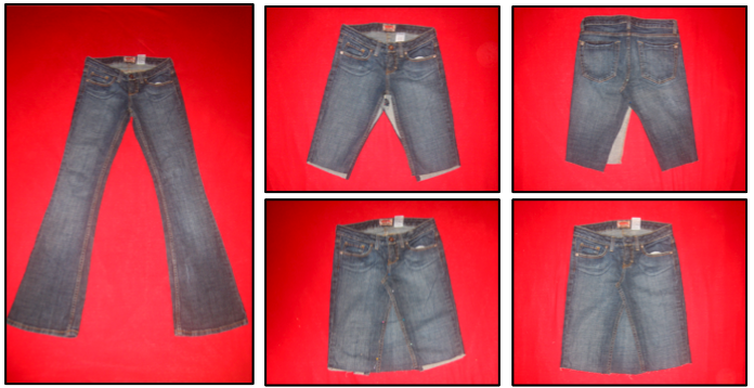
DIY: Transform Your Jeans into a Miniskirt
As classes wind down, the days grow longer and the temperature hovers
in the '70s, students across campus seem to sacrifice fabric and
dignity alike as an homage to Mother Nature.
Like beasts shedding their fur after a harsh winter, guys often forgo shirts and cut off their pants, while girls squeeze into suffocating shorts, diminutive tops, scanty dresses and the famed miniskirt. Throughout this ritual, two trends dependably emerge each season: flesh and denim.
The lovechild of Twiggy and Daisy Duke, the denim miniskirt classically epitomizes this season's trends while boasting versatility, style, ruggedness and practicality. With just a needle and thread and an old pair of jeans, anyone can partake in the trend and seasonal festivities at no cost and the ability to perfect the length, wash and fit to your liking, with the assurance that it will be completely original no matter how many denim skirts flood the Drillfield.
Materials: one pair of jeans, needle and thread, scissors
Time: 45 minutes
Cost: Free or $3-$5 for jeans at the thrift store
Step One: Lay jeans flat and cut off the legs a little bit longer than the desired length. Put legs aside, you will use the material later. Remember that you can easily take more off when you are done, but if you cut it too short now you are stuck with it. Cut along inner leg seams and crotch until the jeans resemble shorts with no inner seams or a skirt with a triangle cut out of the front and back.
Step Two: Cut along the crotch seam to the zipper and pin it over so that it is flat. Repeat in the back, cutting until you can make it flat and pinning in place.
Step Three: Take the excess leg material you put aside and cut two panels big enough to cover the triangle shaped gap in the front and back of skirt. Pin in place.
Step Four: Sew along the pinned areas and cut away excess material.
Step Five: Try on skirt and decide desired length. Cut accordingly. It will fray a bit in the wash, so leave a little bit of extra length.
Step Six: Although a cursory glance around campus will suggest that flip flops, bikini tops and oversized shades are the only accessories necessary, I recommend pairing a denim skirt with flats and a feminine blouse for a classy contrast, or worn brown boots, a rugged T-shirt and slouchy cardigan for disheveled perfection.
DIY: Maternal Instincts

Weighing in at 6 pounds 7 ounces, my bundle of joy arrived about three months after my 21st birthday. Born of late nights spent double-fisting Mr. Sam Adams and Gentleman Jack Daniel’s, I nursed my baby bump by unabashedly drinking for two.
Pregnant with drink specials and seasonal festivities, bars have been a tempting destination to miscarry my better judgment and adopt both expensive bar tabs and a budding beer belly. Providing a warm, dark, nurturing environment, bars and alcohol have a long-standing legacy of providing a surrogate womb to the ailing student body that is weakened by spring fever and final exams.
And as the last term of collegiate gestation comes to a close, graduating students are right to embrace the environment that fostered their educational and social development before they are pushed into the real world and slapped by bills and a bleak job market.
Unfortunately, nurturing such a lifestyle is a known detriment not only to your health, but also to your bank account.
Desperate to keep happy hour happy, I’ve developed a solution to defeat this postpartum recession while satisfying my expanding waistlines and shrinking savings: through mixing my own drinks and mixing up my wardrobe.
Raise your glass (and refill it too) to simple DIY solutions for cocktail attire, salvaged from a resource as untapped as next year’s freshman class: carelessly aborted, secondhand maternity wear.
Maternity Shirts: Hide Your Beer Belly and Discover Your Sex Appeal
Designed to flatter the stomach and provide enough length to conceal a baby bump, maternity shirts generally have a great neckline and extended front that can be worn as a tunic with minimal alterations. You may need to shorten the straps by cutting them to the appropriate length and sewing them back in place, but I’ve also found a slew ready to wear. Pair with tights or skinny jeans, stilt-rivaling heels and oversized jewelry for a look that will send singles crawling to your side.
Matronly Mu-Mus: A Makeshift Homeless Shelter or Fringed Frock
Bursting with options like a belly two weeks past due, thrift stores dependably offer a hearty selection of massive muumuus and oversized dresses whose shapeless silhouette are perfect for housing twins or converting into a flirty fringe frock.
Whether you covet a vivacious print for a hippy-chic look or a solid color to channel the mods, a few simple snips can convert your pick into a comfortable shift dress. Simply try on the dress to find your desired length — I’ve found that using where your fingers fall when you hold your arms to your sides is a good length — and snip away, leaving an extra inch if you want to hem it, plus an extra three or four inches for fringe. Satisfy your sadistic cravings, and haphazardly cut the bottom vertically to create fringe. Pair with a belt or wear on its own with tights and boots, and you are left with a glam look cozier than your mother’s womb.
Elastic Banded Maternity Skirts: Stretch Your Dollar, Not Your Waist in This Makeshift Cocktail Dress
Get “waisted” in seconds when you transform an elastic-waisted skirt into a strapless dress. Scour the thrift store or your mother’s maternity clothes for simple, mid-length skirts with a wide elastic waistband. Worn under your arms and paired with a wide belt, you can create an elegant cocktail dress that flatters your thinnest features and leaves plenty of room for your belly bulge.
DIY: Dye
As the temperature slowly creeps up, drugstores display aisles of
pastel-colored candy, glossy magazines boast the newest trends, and it
becomes apparent that spring is finally upon us. Delving into the
depths of my closet to retrieve my springiest duds, I am greeted with a
slew of faded, stained and lifeless clothes from seasons past. In
the spirit of spring, it is this pile I reach for, hoping to bring new
life to these once-forgotten garments now fertile with potential.
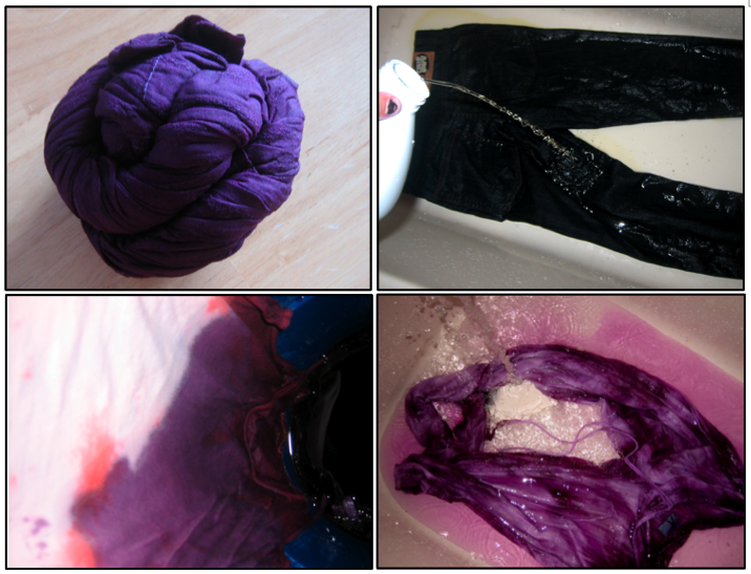
Armed with RIT Dye and bleach, I set out to dye, tie-dye, and bleach old trends, livening up my wardrobe with all the fun of dyeing Easter eggs.
To dye or tie-dye:
Step One: (Skip this step if you are just dyeing) There are a number of techniques you can use to tie-dye, but the simplest is to twist your garment and then form a ball, holding it together with rubber bands if necessary.
If you want to create a spiral, clench the middle of the garment and twist until it is a small bunch and then fasten it with rubber bands.
Step Two: Prepare a dye bath by combining 1 cup salt, 1 packet of RIT dye and 1 gallon of hot water in a large bucket. Stir until the powder has dissolved.
Step Three: Soak your garments in the dye bath.
If you are tie-dyeing, you can make a second dye bath for dual colors or just use one.
The longer you leave your garments in the dye, the darker they will be.
Remember that they fade once the dye is washed out, so leave them in longer than the desired color. To dye something a bright, solid color, leave it in for at least 15 minutes.
Step Four: After your garments have soaked, remove them and let them air dry.
Allow tie-dye to dry still held together.
Step Five: After they are dry, unravel tie-dye and rinse out any remaining dye until the water runs clear.
If you have a washing machine, wash them after you rinse them and then dry on high.
Your garment is freshly dyed! Be careful to wash it alone the first few times, though; RIT dye is pretty color safe.
To bleach jeans:
Step One: Wet your jeans in a bathtub and lay them flat.
Step Two: Pour bleach directly on the jeans.
For an acid-washed appearance, splatter it on irregularly and rub it in with a washcloth or kitchen brush.
For an overall bleached look, pour it on evenly.
Every pair of jeans will react differently with the bleach - some begin to fade immediately, others need to sit.
Always wash them too soon and pour on more bleach rather than risk them being too bleached (because if you soak them long enough, they can start to fall apart).
Step Three: Rinse out jeans until the water runs clear and the jeans are slightly darker than the desired color.
They will lighten up even more in the washer and dryer. Repeat if needed.
Step Four: Wash and dry your jeans alone, as you normally would with a little bit of detergent. If they are the wrong color, you can always repeat the bleaching process - or RIT dye them!
DIY: Emblazoned Sweatshirt
Getting dressed in the morning is always a struggle, particularly
when I find myself having to pry open my dresser drawers and sift
through the colossal mound of outgrown, outdated and out-of-style
T-shirts.
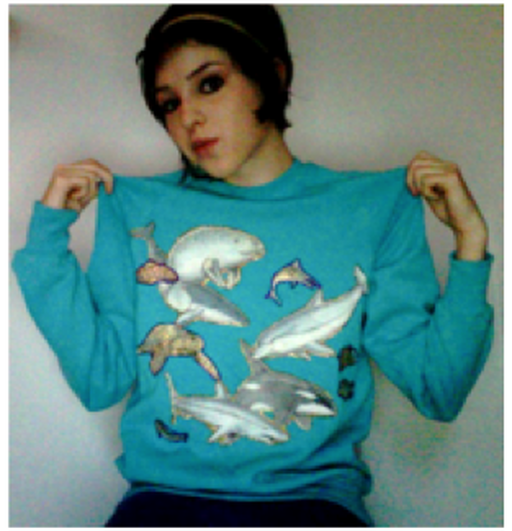
Unable to face the guilt of throwing away these relics of my childhood and even more unable to face the shame of actually wearing them, the pile sits undisturbed, malignantly dominating valuable space in my dresser. Determined to conquer my fear of being consumed by the heap and the memories tied to it, I sift through the slew of cross country shirts from high school, free T-shirts from every Virginia Tech event, and hand-painted disasters from summer camp to find a few jewels: a majestic unicorn shirt from the thrift store, a cutesy kitten shirt from elementary school, and a cosmic sea manatee shirt from a family vacation to Florida. Overly cheerful and mildly creepy, the graphics are perfect material for my next project: an '80s-inspired crew neck animal sweatshirt that, by achieving every fashion faux pas, is "so bad it is good." Armed with a fluorescent sweatshirt, glitter glue, puff paint and an awesomely bad tee, I have the recipe for success.
Materials:
One crew neck sweatshirt: there are always plenty at the thrift store, but for the less thrift savvy, Wal-Mart will do.
One old graphic tee: any size
Puff paint: any color
Gold glittery fabric paint
Small paintbrush
Fabric glue
Cost:Free if you have the items lying around the house, but up to $10 if you have to start from scratch
Step One: Carefully cut out the graphic or graphics from your T-shirt. I chose one with a number of different animals, but you can just as easily use one with a single graphic or combine two shirts. Arrange the graphics on your sweatshirt and glue down using a thin layer of glue (applied best with a paintbrush), thoroughly covering the back of the graphic.
Step Two: (Optional) Apply a thin layer of glitter paint on your graphic. I chose only certain parts to glitter, but it is up to you.
Step Three: Outline your graphics with puff paint to give them the ultimate '80s flair.
Step Four: Let dry for about 12 hours. As evidenced by the amount of glittery paint that still covers my pants, computer, couch and roommates, this step should not be taken lightly, no matter how excited you are to model your creation.
Style Tips: Because of the kitschy, cute nature of this piece, I advise wearing it with something of contrast. For girls, pair it with ultra skinny jeans or just tights and leather boots with bold accessories: a metallic headband, black nail polish and over-the-top earrings. For guys, throw on some slim fitting jeans, Keds or boots, and just wait for the flocks of girls to be impressed by your seemingly sweet side.
DIY: Turtle Neck Collar
Eclectically close-minded and endlessly stubborn, my interests are
black, white and otherwise erratic. If I’m not an
impassioned-heart-fluttering, iridescently glowing,
toothy-grinning-enthusiast, I’m a crossly-staring-obviously-scowling,
vomit-suppressing, eye-shifting detractor who shamelessly dooms
potential love interests and budding fashion trends alike.
Such is my relationship with collars.
Choked by 13 years of stifling school uniforms, I distanced myself from the suffocating accessory without hesitation. And there has been little temptation, considering the general “blah” of the polo and tacky factor of affordable steam-punk and neo-Victorian frocks.
Paired with evening gowns and lacy webs of fabric, high fashion designers like Lanvin, McQueen and Givenchy have repeatedly charmed the runway with dark, elegant takes on the noose’s delicate cousin. Yet, visions of my body flayed across the road amid a tangle of fabric and ruffles caused me to save the cumbersome trend for days when I don’t have to compromise checking my blind spot for high fashion.
Yet, just as I was letting go of my high collar ambitions, I stumbled across the work of New York based fashion designer Timo Weiland and encountered a vision free of a blind spot give-and-take: soft, detached, ruffled wreath-like collars far too sweet to strangle or obscure vision.
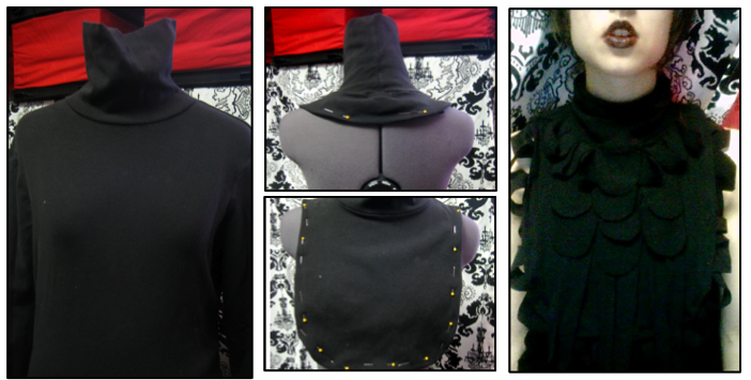
Too broke for Timo, but too infatuated and inspired to wait for this love to fizzle, I tore through my wardrobe to create my own rendition. Armed with scissors, a sewing machine and a plain black turtleneck, I concocted this frock just in time for the spring breeze.
Cost: $3
Time: One hour
Materials: One turtleneck
Step One: Start by cutting the arms off your turtleneck and proceed to remove excess fabric from the back, as if to create a backless halter top. Cut remaining fabric in front into a bib shape.
Step Two: Pin what should look like a backless, turtleneck bib in place.
Step Three: Use remaining fabric to cut out shapes and strips to pin along the collar. Be creative, use loops, ruffles or anything else you can dream of.
Step Four: Sew in place.
Flaunt it. Your collar can be dressed up or dressed down. Layer it with a structured jacket, a loose tank, a plain white tee, a floral dress, your boyfriend’s slacks, your mom’s wedding dress or all of the above.
Such is my relationship with collars.
Choked by 13 years of stifling school uniforms, I distanced myself from the suffocating accessory without hesitation. And there has been little temptation, considering the general “blah” of the polo and tacky factor of affordable steam-punk and neo-Victorian frocks.
Paired with evening gowns and lacy webs of fabric, high fashion designers like Lanvin, McQueen and Givenchy have repeatedly charmed the runway with dark, elegant takes on the noose’s delicate cousin. Yet, visions of my body flayed across the road amid a tangle of fabric and ruffles caused me to save the cumbersome trend for days when I don’t have to compromise checking my blind spot for high fashion.
Yet, just as I was letting go of my high collar ambitions, I stumbled across the work of New York based fashion designer Timo Weiland and encountered a vision free of a blind spot give-and-take: soft, detached, ruffled wreath-like collars far too sweet to strangle or obscure vision.
Too broke for Timo, but too infatuated and inspired to wait for this love to fizzle, I tore through my wardrobe to create my own rendition. Armed with scissors, a sewing machine and a plain black turtleneck, I concocted this frock just in time for the spring breeze.
Cost: $3
Time: One hour
Materials: One turtleneck
Step One: Start by cutting the arms off your turtleneck and proceed to remove excess fabric from the back, as if to create a backless halter top. Cut remaining fabric in front into a bib shape.
Step Two: Pin what should look like a backless, turtleneck bib in place.
Step Three: Use remaining fabric to cut out shapes and strips to pin along the collar. Be creative, use loops, ruffles or anything else you can dream of.
Step Four: Sew in place.
Flaunt it. Your collar can be dressed up or dressed down. Layer it with a structured jacket, a loose tank, a plain white tee, a floral dress, your boyfriend’s slacks, your mom’s wedding dress or all of the above.
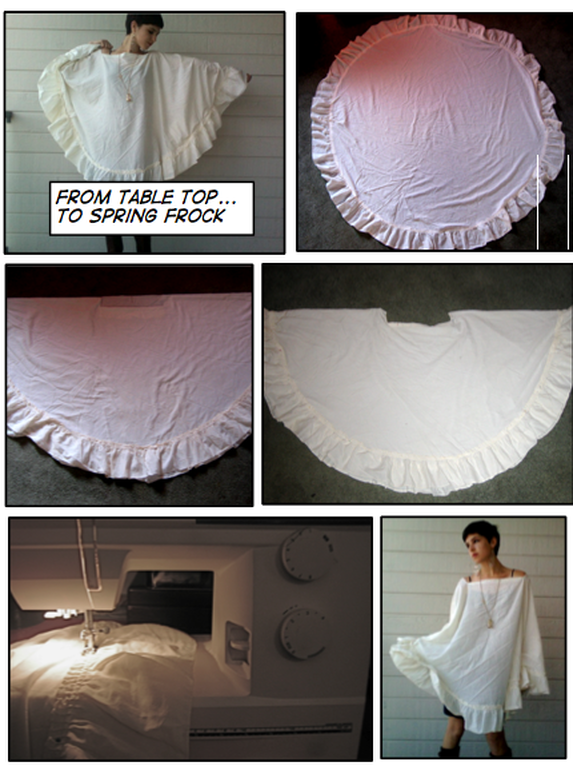
DIY: Tablecloth Dress
As the flowers and leaves dare to creep back after yet another frigid
Blacksburg winter, I am overcome with an uncontrollable desire to
frolic through the vast fields that encompass the town. While the
rolling hills and budding countryside beckon, I experience a similar
call from the tiered skirts, billowing blouses, and ruffled dresses that
fill the pages of Spring fashion spreads, romantically catching the
wind like sails and undoubtedly propelling the wearer to a different
world entirely.
Despite the delicate nature, required upkeep and high price tags of such garments making them seemingly unpractical for romps through the wilderness, I am unable to sacrifice my dream-like fantasies. After weeks of perusing my closet, fashion magazines and thrift stores for a solution, I discovered the key to constructing my own practical, durable and inexpensive garment lay before my eyes - on the kitchen table.
Materials:
One ruffled tablecloth: round for long sleeves, rectangular or square for short sleeves. You can use a tablecloth without ruffles (or any fabric really - a window treatment, bed sheet, etc.) for similar results without the frills.
Needle and thread
Cost: $1 to $2 if you do not already have a suitable tablecloth
Time: 30 minutes tops - with plenty of time left for frolicking!
How to construct a frolic-friendly field dress from a tablecloth:
Step One: Fold your tablecloth in half. I used a round one so it can be folded in any direction and still be equal, but if you use a rectangular one, fold it long ways.
Step Two: Mark the very middle of the top of the tablecloth and cut two one inch slits about four inches from the center on each side. Cut the fabric along the fold and fold under. This is where your head will go.
Step Three: Slip the garment over your head to make sure the hole is big enough. If so, pin and hem the incisions. It should create a rectangular neckline.
Step Four: Lay the garment flat and pin together the edges along the ruffle in a semicircle, leaving about eight inches from the top (for armholes) and the bottom (about shoulder to shoulder) open.
Step Five: Sew all the pinned areas, trim away excess thread and frolic!
Style Tip: Embrace your inner flower child and pair with a long necklace, headband, chandelier earrings and high, earth-toned boots.
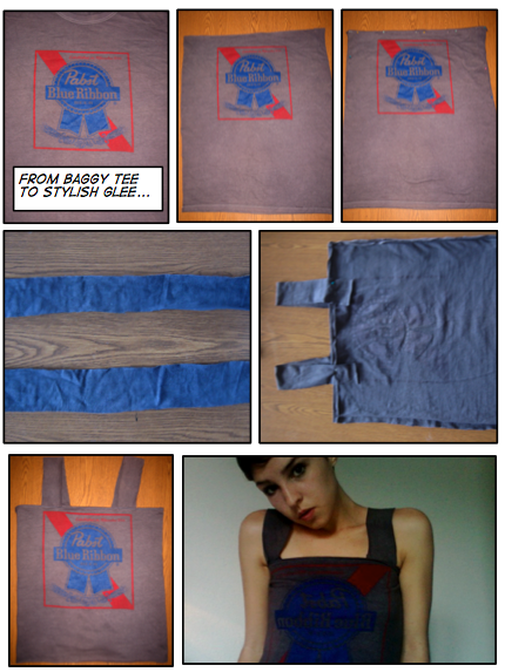
DIY: Graphic Tank
As Facebook and MySpace maintain a persistent grasp on our
generation, actual communication has become increasingly endangered. Why
bother asking someone about his taste in music when, with a few clicks,
you can access a list of his favorite bands? Why risk rejection
and disappointment by asking a guy out without first checking his
relationship status? And really, why ask anyone out without first
doing a thorough background check on political affiliation, religious
beliefs, interests and friends - not to mention hundreds of photos of
them at their best, and, unless they are a definite untagger, worst?
As we become more dependent on our modified process of natural selection, other aspects of life have followed suit - including the fashion world. Emblazoned with everything from cheeky phrases to iconic references to television, literature, music, film, politics and celebrities, the graphic tee allows you to literally wear your interests on your sleeve. Although dozens of retailers boast graphic tees, they are hardly original when hundreds of people are sporting the same shirt - not to mention those that are overpriced.
However, a quick trip to a thrift store can provide plenty of original options at a fraction of the price, the only issue being the inevitably huge size. Yet, with a few simple adjustments, you can modify an oversized tee into a chic, fitted graphic tee tank sure to impress any pop culture enthusiast and let your interests be seen without the obsolete small talk.
Step One: Lay the T-shirt on a flat surface and cut across the top just below the collar as well as down the sides, removing the sleeves and creating two rectangles of fabric.
Step Two: Turn the shirt inside out. Fold over the top of the shirt and pin in place.
Step Three: Pin the sides together to create a tube. The width should be wide enough to put the shirt on with ease, but slim enough to be flattering.
Step Four: Sew the seams where you have pinned.
Step Five: Try on the shirt. Mark where you want the bottom of the shirt, and cut off excess fabric.
You can hem it, but I left mine raw for a rugged appearance.
Step Six: Using the leftover fabric from the bottom of the shirt, cut two strips, about 1.5 inches thick for straps.
These can also be hemmed, but if cut carefully, do not need to be.
Step Seven: Pin and sew in place.
Style tip: It is hard to go wrong with this graphic tank. It can easily be dressed up or down. For a casual look, pair it with jeans or shorts and add a plaid shirt or cardigan on cooler days, or wear it over a basic long sleeve tee as a vest.
To dress it up, pair it with a blazer or feminine skirt for an interesting contrast.
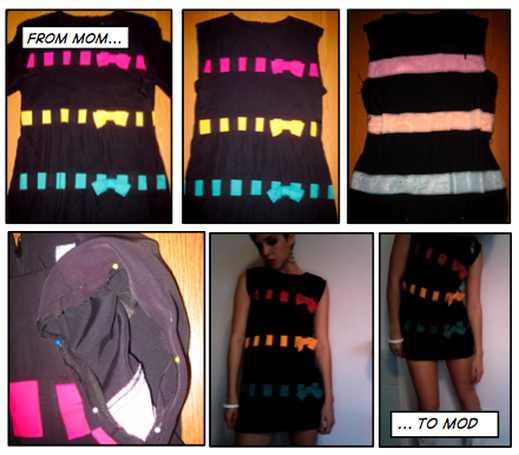
DIY: Shift Dress
Defined by neon colors, bold patterns and exaggerated silhouettes, my
closet reflects my unabashed embrace of the decade graced by David
Byrne, Kate Bush and Madonna at their finest: The '80s.
Unfortunately, the otherwise glorious trends remain tarnished by one delusional creation - shoulder pads. Inexplicably huge and undeniably unflattering, I purged my wardrobe of shoulder pads as soon as I could wield a pair of scissors, discovering that with just a few snips almost any shoulder padded garment can be easily transformed into a tolerable piece rich with potential. One such look is a classic shift dress. Versatile and flattering, you can easily create your own from one of the many-sleeved '80s dresses that undoubtedly clutter both thrift stores and your mother's closet.
Materials:
One oversized 80's dress, shoulder pads optional
Sewing Machine
Pins
Scissors
Time: One hour
Cost: $3-$5
Step One: First things first, remove the disgraceful shoulder pads with scissors. They are usually attached with just a few strings, so it should be simple.
Step Two: Lay the dress flat and cut off the sleeves at the seams to create a sleeveless tank dress.
Step Three: Turn the dress inside out and try it on. Pin it so it has a straight, close, but not too tight fit. Pin the hemline well above the knee, approximately where your fingertips hit your thigh.
Step Four: Sew and hem where you have pinned. Turn it inside out and check for evenness and fit; revise if necessary. Otherwise, cut away extra fabric.
Step Five: Pin and hem the raw edges of the sleeves. Cut away any excess fabric and relish your triumph over shoulder pads.
Style Tip: Pair with knee high boots, chandelier earrings, neon tights and smoky eyes for a mod look, or pair with heels and a long necklace for your next cocktail party.
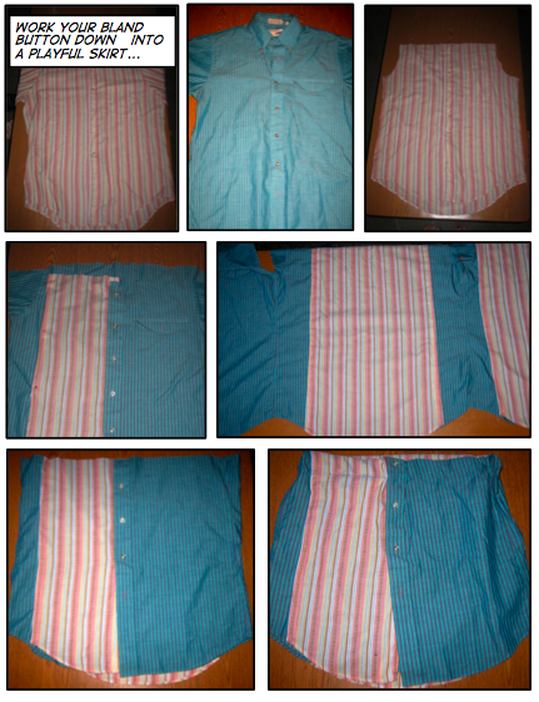
DIY: Clothes That Fit Every Body
Since Eve's initial realization and horror that she was naked, women
throughout history have been uncomfortable with their bodies and
obsessed with weight.
Dieting on everything from grapefruit to tapeworms, achieving the ideal figure has caused more than just hunger pangs -- starvation, infertility and a lifelong battle with eating disorders have become problems for many women.
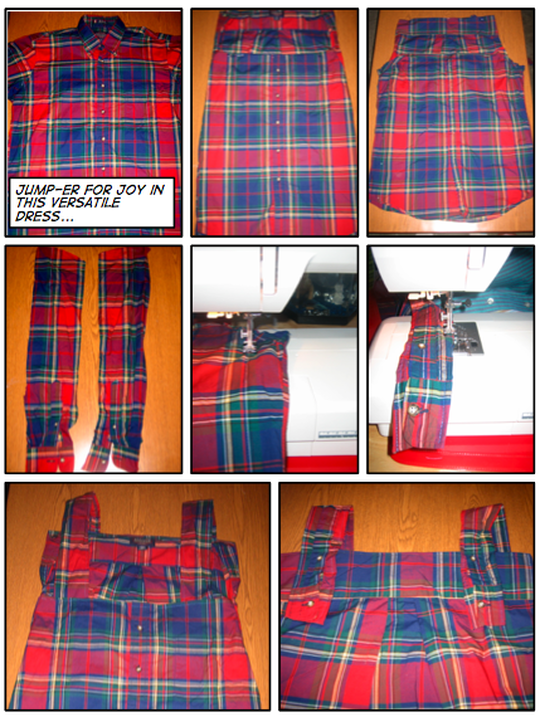
Last month, Virginia Tech featured a number of programs and speakers to promote National Eating Disorder Awareness Week to draw attention to the fact that according to sources from Brigham Young University-Idaho, about four-fifths of college girls suffer from some disordered eating habits. Yet, no matter how many times the dangers of eating disorders are reinforced by those around you, the decision to love your body must come from within -- and the best way to boost your confidence is by dressing the part. With just a few old button-down shirts, you can make a flattering jumper or skirt sure to showcase your best assets.
To flatter the hourglass or pear figure and draw attention to your waist or create the illusion of curves, try the Button Down Contrast Skirt:
Materials:
Two oversized button-down shirts (vertical stripes are most flattering and create the illusion of a longer, slimmer figure)
Needle and thread
Elastic, cut to fit snuggly on your natural waist
Cost: $6 to $10
Time: One hour
Step One: Lay both shirts flat and cut away the sleeves and the collar of each shirt.
Step Two: On one shirt, cut across the shoulders so that it is open on both the top and bottom. On the other, cut the buttoned panel from the front of the shirt and cut out the back panel. Lay the back panel on the back of the other shirt and hem so that there are a few inches of the other shirt still showing, but it covers the majority of the back of the shirt. Lay the buttoned front panel directly over the buttons on the shirt and pin in place, leaving a few inches of the other shirt exposed on opposite edge.
Step Three: Sew the contrasting panels on the shirt where it has been pinned.
Step Four: Cut under where the sleeves on the shirt are so that it is straight across. This will be the waist of the skirt. Fold this in so it is the desired length (should be worn on the natural waist) with enough room to insert elastic.
Step Five: Sew down the waist, but leave a small gap in the side of the skirt. Make a small incision so you can insert elastic here around the band of the skirt.
Step Six: Attach elastic to a safety pin and push it around the band of the skirt, using the safety pin as a guide to pull the elastic through. When it comes full circle, sew the ends together.
Your skirt is complete. Wear it with a camisole and cardigan, tights, and flats or boots in the winter, or just a basic tee and flats in the summer. Add a belt to further accentuate your waist.
Dieting on everything from grapefruit to tapeworms, achieving the ideal figure has caused more than just hunger pangs -- starvation, infertility and a lifelong battle with eating disorders have become problems for many women.
Last month, Virginia Tech featured a number of programs and speakers to promote National Eating Disorder Awareness Week to draw attention to the fact that according to sources from Brigham Young University-Idaho, about four-fifths of college girls suffer from some disordered eating habits. Yet, no matter how many times the dangers of eating disorders are reinforced by those around you, the decision to love your body must come from within -- and the best way to boost your confidence is by dressing the part. With just a few old button-down shirts, you can make a flattering jumper or skirt sure to showcase your best assets.
To flatter the hourglass or pear figure and draw attention to your waist or create the illusion of curves, try the Button Down Contrast Skirt:
Materials:
Two oversized button-down shirts (vertical stripes are most flattering and create the illusion of a longer, slimmer figure)
Needle and thread
Elastic, cut to fit snuggly on your natural waist
Cost: $6 to $10
Time: One hour
Step One: Lay both shirts flat and cut away the sleeves and the collar of each shirt.
Step Two: On one shirt, cut across the shoulders so that it is open on both the top and bottom. On the other, cut the buttoned panel from the front of the shirt and cut out the back panel. Lay the back panel on the back of the other shirt and hem so that there are a few inches of the other shirt still showing, but it covers the majority of the back of the shirt. Lay the buttoned front panel directly over the buttons on the shirt and pin in place, leaving a few inches of the other shirt exposed on opposite edge.
Step Three: Sew the contrasting panels on the shirt where it has been pinned.
Step Four: Cut under where the sleeves on the shirt are so that it is straight across. This will be the waist of the skirt. Fold this in so it is the desired length (should be worn on the natural waist) with enough room to insert elastic.
Step Five: Sew down the waist, but leave a small gap in the side of the skirt. Make a small incision so you can insert elastic here around the band of the skirt.
Step Six: Attach elastic to a safety pin and push it around the band of the skirt, using the safety pin as a guide to pull the elastic through. When it comes full circle, sew the ends together.
Your skirt is complete. Wear it with a camisole and cardigan, tights, and flats or boots in the winter, or just a basic tee and flats in the summer. Add a belt to further accentuate your waist.
DIY: Clothes That Fit Every Body Part Two
For those wishing to draw attention to their bust or
create the illusion of a bust is the Button Down Jumper:
Materials:
One button-down shirt (darker colors are more flattering, as are vertical stripes, though bold prints are fun, too)
Needle and thread
Cost: $3 to $5
Time: One hour
Step One: Lay shirt flat and cut away the sleeves and the collar. Hold onto the sleeves for Step Six.
Step Two: Cut the back straight across but leave as much of the material as possible. Cut the front straight across at the bottom of the armholes. Fold over and pin both.
Step Three: Cut a section down the length of the sleeves (I included the buttons on the cuff for flair). Hem these so they are about an inch wide.
Step Four: Turn the shirt inside out and sew down the sides to make it a sack. The top should be about five inches lower in the front than the back, but the bottom should match up.
Step Five: Try the garment on -- depending on your shape, you may want to make it tighter on sides. Adjust.
Step Six: Attach straps made from sleeves. I made mine about an inch from the sides, but they can be attached however you find flattering. Sew the plain part under the front and the cuffs over on the back so the button details are exposed.
Your jumper is complete. Wear it over a basic long-sleeved tee with leggings and boots in the winter or a camisole and flats in the summer.
DIY: Skinny Jeans
When it comes to fashion, I’m a self-proclaimed
swinger. Although I have my favorites, I rarely limit myself to just one type,
let alone dismiss entire styles entirely.
My one exception, however is skinny jeans. Starting years ago as just a casual encounter, we entered a
torrid love affair that has led to an exclusive relationship. Recently, I’ve
been joined by guys and girls alike who have embraced the skinny trend,
favoring the slimmer fit for an abundance of reasons: they do not drag sloppily
or get caught in a bike chain,
they lengthen and flatter silhouettes of all shapes, come in an offbeat
range of colors and showcase a variety of footwear. Yet, as stubbornly anti-skinny
jeans as I am pro-skinny jeans, there remains a resistant horde of bootcut,
bellbottom and (dare I say) cargo jean devotees that refuse to convert. Whether
they claim skinnies are too expensive, too tight, too trendy, or too hard to
find, I have heard all of the excuses and I have a simple proposition—make your
own.
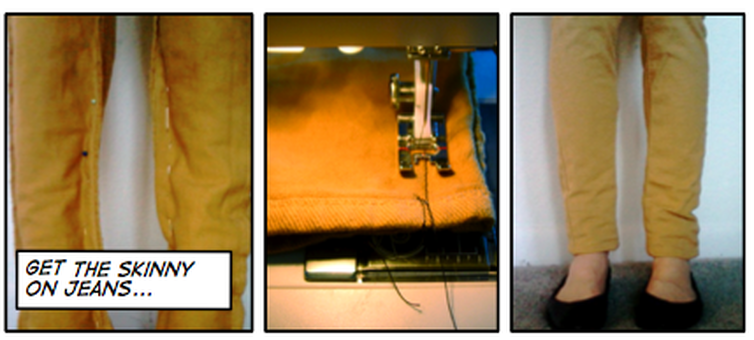
With just handful of pins and a needle and thread, you can convert any jeans to skinny jeans and have control over the wash, rise, and tightness without having to splurge.
Materials:
One pair of jeans
Needle and thread or sewing machine
Pins
Cost: Free
Time: Half an hour
Step One: Turn jeans inside out and try them on (It may seem odd at first, but by your next pair, you will be a professional.)
Step Two: Pin the jeans from the knee to the desired width. If you want a modestly skinny jean, just continue the seam at the knee in a straight line. For cigarette or skinny pin jeans, make take them tighter. Personally, if they aren’t cutting off my circulation, they aren’t tight enough, so I pin them as close to my calf and ankle as possible. Make note though that unless your jeans have stretch, you need to leave enough space to be able to fit your feet in!
Step Three: Take off the jeans, turn them inside in, and try them on. If you are satisfied with the width and cut, you are ready to sew. Otherwise, re-pin as necessary and repeat until it is right.
Step Four: Turn the jeans inside out again and sew along the pins. Make sure to use durable thread and double stitch the leg openings where you pull them on so you don’t have to worry about being too hard on them.
Step Five: Cut away excess material, turn inside out, and leave any thoughts of nonskinnies behind!
Style Tip: Skinny jeans can be paired with practically anything. For girls, the slim cut compliments both oversized tops for contrast and form fitting tops for a polished look. They are perfect for tucking inside boots, wearing with flats or pulling on over high heels. For guys, pair your skinny jeans with your favorite tee and cardigan, boat shoes, low tennis shoes like Ked’s or Tom’s or boots.
DIY: Circle Scarf
Like a hearty bowl of cereal, the sudden ice age has overtaken Blacksburg with a “snap, crackle and pop.”
As broken wrists, shattered knee caps and throbbing shiners decorate a growing portion of the student body, day-to-day life has become a game of survival.
Naturally, fashion has been forced to the backseat as piles of coats, doubled-up pants and tragically thick hiking boots have become the most effective means of defense. I, myself, have fallen prey to the layered look, swollen with both sweaters and bulging black eye; it is a testimony to my own adventures in ice skating.
Yet, as another blizzard looms this weekend, I am becoming increasingly more determined to move beyond homeostasis and terminate the fashion blunders this weather has justified.
Combining a few pieces of scrap fabric with some dregs of the winter wardrobes of my past, I have created a fashionable, but incomparably cozy circle scarf sure to defeat the “Survival of the Ill-Fittest” that has taken campus by storm.
Materials
Old sweaters, flannel shirts or whatever you fancy to keep you warm
Needle and thread
Pins and scissors
Step One: Cut assorted fabrics into strips twice the desired width of your scarf (It will be doubled over when complete) and when laid end to end, the desired length of your scarf. Generally, I cut my sections to equal at least four feet total long and at least one foot wide.
Step Two: Pin together your strips of fabric. Sew along lines.
Step Three: Fold your scarf widthwise, inside out. Pin and sew along the line.
Step Four: Turn your scarf right-side out. It should now be a long tube.
Step Five: Turn the unfinished ends in and tuck together in a circle. Pin and sew into place.
Style Tip: Your one-of-a-kind circle scarf is now complete and can be worn in a slew of ways. Try wrapping it around your neck twice for a loosely fitting, fashionable accessory or three times to stay particularly warm. Pull it over your nose to brave the cold, or drape it over your head for a makeshift hat. You will find that the possibilities are as endless as a circle itself.
DIY: Maxi Dress Jumper
As temperatures plummet
below freezing, I find myself abashedly yearning for the days where shapeless,
saclike maxi dresses dominated the fashion scene, allowing women everywhere to
escape from the cold in a tent-like confection that ensured the warmth and
practicality of a sleeping bag. Unfortunately, since the demise of Laura Ingles
Wilder and Laura Partridge, such garments been purged from any respectable
wardrobe and left to collect dust at thrift stores everywhere.
Although such maxi dresses may never again grace the cover of Vogue, they can be easily updated to create a one-of-a-kind cozy, yet sophisticated jumper perfect for layering on bitter January days.
Materials:
One sleeved maxi dress
Sewing pins
Needle and thread or sewing machine
Scissors
Time: About one hour
Cost: $3-5, depending on the price of the dress
Step One: Take a trip to the thrift store, raid your grandmother’s closet, or dig through your old Halloween costumes to find a sleeved maxi dress. I chose one with an offbeat turtleneck, but almost any neckline will do— the flexibility of clothing reconstruction is what makes it unique and fun.
Step Two: Lay out the dress on a flat surface and cut off the sleeves to create a sleeveless dress. You should leave about an inch of extra fabric from where you want the seams to be to allow enough room to fold and hem it.
Step Three: Cut off the bottom of the dress just below the knee. Again, leave about an inch of extra fabric to hem.
Step Four: Fold under the raw edges you just cut to desired length and pin in place.
Step Five: Using either a sewing machine or needle and thread, hem along the line of pins to complete the transformation from dowdy maxi dress to hip jumper.
Style Tip: Pair the dress with opaque tights or leggings, a basic long sleeved shirt, and boots for warmth. Alternatively, on warmer days it can be paired with a basic tank and flats.
