D I [WHY]
DIY: Security for Your Laptop
Wrap up your goods.
It seems obvious enough, but statistics suggest an alarming number of Virginia Tech students forgo protection on a daily basis. The excuses are as bountiful as cleavage at a frat party and include everything from "it's too expensive" to "it makes it too bulky." It turns dorm rooms, bars and even classrooms into breeding grounds for disaster. This widespread trend has already left thousands of students suffering from mysterious pockmarks, unsightly scratches and broken equipment that fails to be turned on while thousands more tempt fate by leaving their junk exposed. Students, professors, family and friends: It is time to stop this cycle of inevitable destruction and live without the stress of scares or regrets the morning after. With your own two hands, no partner required, you can create an inexpensive, eco-friendly solution to protect the piece of equipment you use the most - your laptop.
Materials:
Outside Fabric: A sturdy, fabric such as upholstery, canvas, or wool that is at least a two inches bigger than your laptop on each side. I used two different pieces of upholstery for each side to add variety, but this is optional.
Inner Fabric: A thick, soft fabric such as an old sweatshirt or polar fleece blanket that can cover your laptop three times. It is purely for insulation and protection, so you can mix and match different types of fabric if you do not have enough of one kind.
Needle and thread, or sewing machine
Adhesive Velcro
Scissors
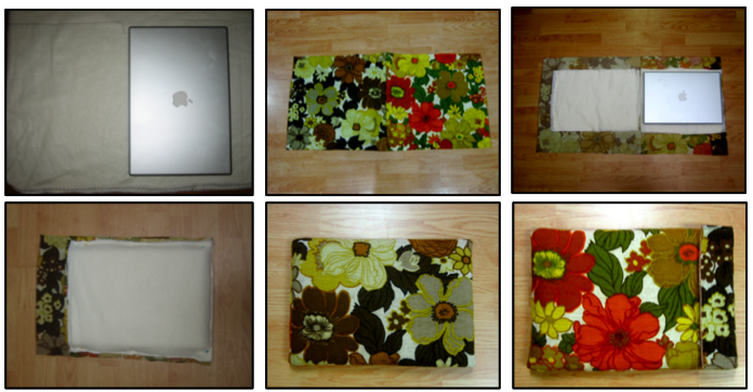
Step One: Using your laptop as a measuring tool, cut two panels from the upholstery (outer fabric) that have at least two inches of room on each side, but three or four inches is desirable. Also cut six panels from the fleece (inner fabric) that have at least one inch of room on each side.
Step Two: Lay the panels of upholstery together with the inside facing out and sew along one side to create one long panel. Hem one side, which will be the closure flap.
Step Three: Lay three panels of fleece on top of each other on the interior of each side of the upholstery so that they touch at the bottom and leave room on the sides and top. Pin in place.
Step Four: Fold down the unhemmed side of the upholstery to the same length as the fleece. Tuck and pin under the fleece.
Step Five: Sew the fleece in place. You will end up with one long panel of upholstery lined with fleece.
Step Six: Fold the panel inside out. The fleece should be even, leaving the hemmed side of the upholstery a few inches longer than the other for the closure flap. Slide your laptop inside and pin around it so that the fit is snug with a little bit of room to make up for lost space on each side when you turn it right side out.
Step Seven: Sew along pins and then trim away excess fabric along the fleece until you get to the closure flap.
Step Eight: Instead of cutting away the excess fabric of the closure flap, fold and pin it in place and sew along the pins.
Step Nine: Turn your bag right side out. Your laptop should fit in snugly.
Step Ten: Stick Velcro with adhesive along the closure flap and on the front of the bag where it matches up. Sew along the sides for durability.
Alas, fashionable protection for your delicate apparatus at a fraction of the price - a choice even your mother would be proud of.
It seems obvious enough, but statistics suggest an alarming number of Virginia Tech students forgo protection on a daily basis. The excuses are as bountiful as cleavage at a frat party and include everything from "it's too expensive" to "it makes it too bulky." It turns dorm rooms, bars and even classrooms into breeding grounds for disaster. This widespread trend has already left thousands of students suffering from mysterious pockmarks, unsightly scratches and broken equipment that fails to be turned on while thousands more tempt fate by leaving their junk exposed. Students, professors, family and friends: It is time to stop this cycle of inevitable destruction and live without the stress of scares or regrets the morning after. With your own two hands, no partner required, you can create an inexpensive, eco-friendly solution to protect the piece of equipment you use the most - your laptop.
Materials:
Outside Fabric: A sturdy, fabric such as upholstery, canvas, or wool that is at least a two inches bigger than your laptop on each side. I used two different pieces of upholstery for each side to add variety, but this is optional.
Inner Fabric: A thick, soft fabric such as an old sweatshirt or polar fleece blanket that can cover your laptop three times. It is purely for insulation and protection, so you can mix and match different types of fabric if you do not have enough of one kind.
Needle and thread, or sewing machine
Adhesive Velcro
Scissors
Step One: Using your laptop as a measuring tool, cut two panels from the upholstery (outer fabric) that have at least two inches of room on each side, but three or four inches is desirable. Also cut six panels from the fleece (inner fabric) that have at least one inch of room on each side.
Step Two: Lay the panels of upholstery together with the inside facing out and sew along one side to create one long panel. Hem one side, which will be the closure flap.
Step Three: Lay three panels of fleece on top of each other on the interior of each side of the upholstery so that they touch at the bottom and leave room on the sides and top. Pin in place.
Step Four: Fold down the unhemmed side of the upholstery to the same length as the fleece. Tuck and pin under the fleece.
Step Five: Sew the fleece in place. You will end up with one long panel of upholstery lined with fleece.
Step Six: Fold the panel inside out. The fleece should be even, leaving the hemmed side of the upholstery a few inches longer than the other for the closure flap. Slide your laptop inside and pin around it so that the fit is snug with a little bit of room to make up for lost space on each side when you turn it right side out.
Step Seven: Sew along pins and then trim away excess fabric along the fleece until you get to the closure flap.
Step Eight: Instead of cutting away the excess fabric of the closure flap, fold and pin it in place and sew along the pins.
Step Nine: Turn your bag right side out. Your laptop should fit in snugly.
Step Ten: Stick Velcro with adhesive along the closure flap and on the front of the bag where it matches up. Sew along the sides for durability.
Alas, fashionable protection for your delicate apparatus at a fraction of the price - a choice even your mother would be proud of.
DIY: Dorm Decor
Dog-earing the pages of decorating magazines and retail catalogs, I
spent a good part of my youth dreaming about dorm décor. I naively fell
prey to the IKEA and Pottery Barn promise of color-coordinated bedding,
trendy wall art and custom paint jobs.
As I began to visit colleges, I was disappointed to discover that dorms are not generally equipped with entertainment centers and walk-in closets, but dingy tile floors, prison-style cinderblock walls, a "no paint, no nails" mantra and a tight budget. Scouring lower-priced retailers, I hoped to find adequate substitutes for the pieces I had been coveting. I came to the conclusion that there is little middle class for dorm dcor - if you cannot afford a leather ottoman and an oak armoire for storage space, you might as well be living out of shoeboxes and plastic crates.
Frustrated but unwilling to accept defeat, I decided to create a room that utilized my space without resembling a prison cell or draining my wallet.
I revamped inexpensive staples collected from thrift stores and discount retailers with simple tricks any student can apply to their own room.
Lofty living: Convert a loft into a room of your own
Make no mistake - my roommate is a gem, but sometimes it is nice to have some privacy.
Rather than suffer through another year of having to test my roommate's ability to sleep through late night study sessions or sporadic craft projects, I developed a plan to use my loft kit to create a bedroom of my own.
By removing the mattress from the top and placing it underneath on the floor, hanging flame retardant fabric around the entire loft and adding a hanging light, you can create a tent-like space to read, write and sleep without worrying about your roommate's schedule.
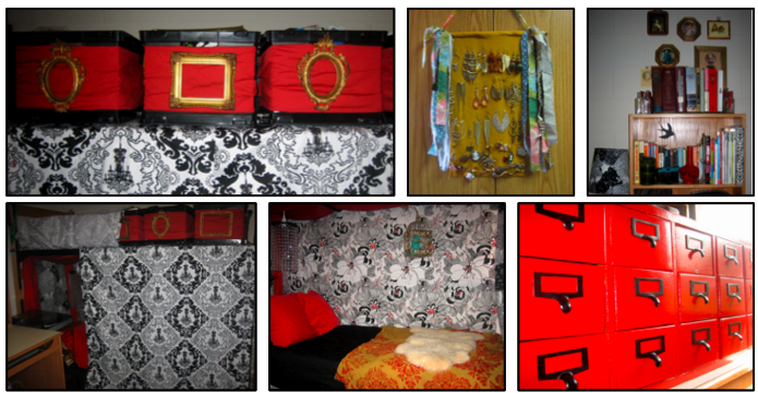
Classy crates: Turn inexpensive milk crates or file crates into attractive storage space
Without a traditionally lofted bed, storage space is scarce - a problem I remedied by placing milk crates on the top of the loft where my mattress once was.
Filled with socks, underwear, accessories, art supplies and anything else imaginable, the crates free up the meager desk, dresser and closet space dorms have to offer.
Even those who loft their beds can take advantage of crates by capitalizing on their stackable design, which opens the door for a multitude of arrangements.
Although unsightly, you can use an old bed sheet to create covers for the crates by cutting the sheet into panels that fit across the front and sides.
Packing tape helps to secure the sheets in the back. Because you only see the front, the gruesomely taped sides and back do not matter.
To dress them up even more, tie on some empty, backless picture frames. The frames can also serve a useful purpose by filling them with art or cards that identify the contents of the crate.
Book smarts: Use homey accents to enhance your bookshelf
An avid reader and music lover, I have acquired a slew of books and records whose handsome pages, colorful covers or antique appeal make them prime candidates for practical decorations.
Instead of relying on your bookshelf as only a place to forget about textbooks, make it a statement piece by arranging your books by color, size or subject. Fill in gaps or free space with those knick-knacks you have cluttering your dresser.
Using removable poster putty, you can decorate the wall above it with lightweight picture frames and real art found at the thrift store - creating a cozier, more home-like feel than the "Breakfast at Tiffany's" or Hokie pride posters found in every other dorm room.
Flavor-filled furnishings: Add spice to your room by thinking outside of the (plastic) box
Traditional dorm furniture generally includes a bed, a desk, a bookshelf and a nightstand, unless you are really being radical and investing in a desk chair, beanbag or set of plastic drawers.
Yet the most efficient and attractive pieces are often those that are not mass-produced. Take a look around the thrift store, yard sales or your grandparent's basement and you are likely to find some real treasures. Instead of spending $20 on a rickety set of drawers or bland plastic boxes to store my art supplies and jewelry, I came across a vintage card catalog. Stained a mousy brown and covered in cobwebs, it was unimpressive at first glance, resulting in the low price of free. But with a few coats of shiny red paint, I transformed it into a striking piece far more unique and practical than most furniture, at a fraction of the cost.
Rocking your room: Never lose an earring again with a DIY jewelry holder
With little room for jewelry boxes, jewelry often gets lost within the heaps of dirty clothes, odd papers and pen caps that clutter the average college student's dresser. I found that earrings were a particular nuisance. Their daily disappearance has resulted in my decision to never wear matching earrings. However, with a little DIY ingenuity, there is a way to keep those wayward earrings in order. Using a twig I found outside, scrap fabric, and a hot glue gun, I created an earring and pin holder in less than five minutes.
After breaking off a straight, foot-long section of a thick twig, cut a section of fabric slightly thinner than the width of the twig and about a foot long. Put hot glue on the twig and wrap the fabric around it once so that it covers the twig.
Tie a thin section of fabric to the two ends so that it can be hung and cut any remaining fabric (I used a different color) into thin strips to be tied decoratively to the ends of the twig. Attach earrings and pins through the fabric and hang it from a hook.
It can also be hung from a closet door or even the corner of a desk when you need it. When you don't want it taking it up space, simply roll it up and store it.
As I began to visit colleges, I was disappointed to discover that dorms are not generally equipped with entertainment centers and walk-in closets, but dingy tile floors, prison-style cinderblock walls, a "no paint, no nails" mantra and a tight budget. Scouring lower-priced retailers, I hoped to find adequate substitutes for the pieces I had been coveting. I came to the conclusion that there is little middle class for dorm dcor - if you cannot afford a leather ottoman and an oak armoire for storage space, you might as well be living out of shoeboxes and plastic crates.
Frustrated but unwilling to accept defeat, I decided to create a room that utilized my space without resembling a prison cell or draining my wallet.
I revamped inexpensive staples collected from thrift stores and discount retailers with simple tricks any student can apply to their own room.
Lofty living: Convert a loft into a room of your own
Make no mistake - my roommate is a gem, but sometimes it is nice to have some privacy.
Rather than suffer through another year of having to test my roommate's ability to sleep through late night study sessions or sporadic craft projects, I developed a plan to use my loft kit to create a bedroom of my own.
By removing the mattress from the top and placing it underneath on the floor, hanging flame retardant fabric around the entire loft and adding a hanging light, you can create a tent-like space to read, write and sleep without worrying about your roommate's schedule.
Classy crates: Turn inexpensive milk crates or file crates into attractive storage space
Without a traditionally lofted bed, storage space is scarce - a problem I remedied by placing milk crates on the top of the loft where my mattress once was.
Filled with socks, underwear, accessories, art supplies and anything else imaginable, the crates free up the meager desk, dresser and closet space dorms have to offer.
Even those who loft their beds can take advantage of crates by capitalizing on their stackable design, which opens the door for a multitude of arrangements.
Although unsightly, you can use an old bed sheet to create covers for the crates by cutting the sheet into panels that fit across the front and sides.
Packing tape helps to secure the sheets in the back. Because you only see the front, the gruesomely taped sides and back do not matter.
To dress them up even more, tie on some empty, backless picture frames. The frames can also serve a useful purpose by filling them with art or cards that identify the contents of the crate.
Book smarts: Use homey accents to enhance your bookshelf
An avid reader and music lover, I have acquired a slew of books and records whose handsome pages, colorful covers or antique appeal make them prime candidates for practical decorations.
Instead of relying on your bookshelf as only a place to forget about textbooks, make it a statement piece by arranging your books by color, size or subject. Fill in gaps or free space with those knick-knacks you have cluttering your dresser.
Using removable poster putty, you can decorate the wall above it with lightweight picture frames and real art found at the thrift store - creating a cozier, more home-like feel than the "Breakfast at Tiffany's" or Hokie pride posters found in every other dorm room.
Flavor-filled furnishings: Add spice to your room by thinking outside of the (plastic) box
Traditional dorm furniture generally includes a bed, a desk, a bookshelf and a nightstand, unless you are really being radical and investing in a desk chair, beanbag or set of plastic drawers.
Yet the most efficient and attractive pieces are often those that are not mass-produced. Take a look around the thrift store, yard sales or your grandparent's basement and you are likely to find some real treasures. Instead of spending $20 on a rickety set of drawers or bland plastic boxes to store my art supplies and jewelry, I came across a vintage card catalog. Stained a mousy brown and covered in cobwebs, it was unimpressive at first glance, resulting in the low price of free. But with a few coats of shiny red paint, I transformed it into a striking piece far more unique and practical than most furniture, at a fraction of the cost.
Rocking your room: Never lose an earring again with a DIY jewelry holder
With little room for jewelry boxes, jewelry often gets lost within the heaps of dirty clothes, odd papers and pen caps that clutter the average college student's dresser. I found that earrings were a particular nuisance. Their daily disappearance has resulted in my decision to never wear matching earrings. However, with a little DIY ingenuity, there is a way to keep those wayward earrings in order. Using a twig I found outside, scrap fabric, and a hot glue gun, I created an earring and pin holder in less than five minutes.
After breaking off a straight, foot-long section of a thick twig, cut a section of fabric slightly thinner than the width of the twig and about a foot long. Put hot glue on the twig and wrap the fabric around it once so that it covers the twig.
Tie a thin section of fabric to the two ends so that it can be hung and cut any remaining fabric (I used a different color) into thin strips to be tied decoratively to the ends of the twig. Attach earrings and pins through the fabric and hang it from a hook.
It can also be hung from a closet door or even the corner of a desk when you need it. When you don't want it taking it up space, simply roll it up and store it.
DIY: Homemade Spa
"When in doubt, take a bath," my mother often reminded me as a child,
since then becoming a dependable retreat for reflection and meditation,
whatever my ailment.
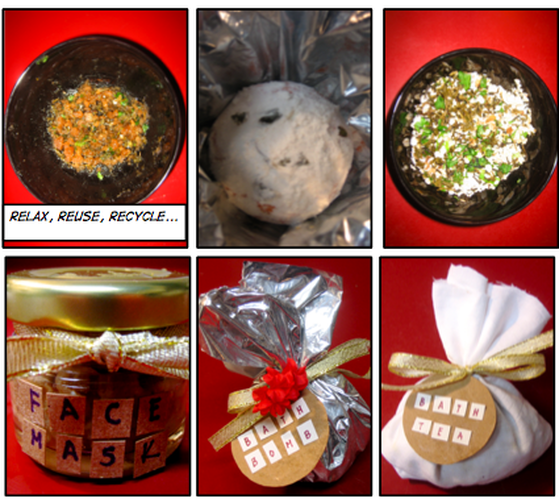
The longer I steep, the more surely my stress, grief or anger melts away, left in the tub with the dregs of bubble bath and body wash. According to holistic health blog Live Lighter and Web MD, a steamy soak is proven to not only improve your mental state and decrease stress, but also provide relief for insomnia, lower blood pressure, improve cardio health, relieve headaches and improve circulation, while enhancing your bath with revitalizing herbs, calming oatmeal, soothing salts and antiseptic honey can improve your complexion, prevent breakouts, and further reduce stress. With basic household ingredients, you can create your own organic bath remedies in your own kitchen to indulge yourself or share with a friend.
Herbal Bath Tea
1 cup of rosemary, chamomile, rose, mint, thyme, bay leaves or lavender
1 cup oatmeal or Epsom salt
Muslin or cheesecloth
Needle and thread
Step One: Create your own combination of dried herbs or flowers in a medium bowl. (You can use as many as you want, just keep in mind the 1:2 ratio of flowers to oatmeal or salt.)
Step Two: For sensitive skin, add oatmeal. To soothe sore muscles, add Epsom salts.
Step Three: Make appropriately-sized pouches of muslin or cheese cloth by cutting two pieces of fabric and sewing together three sides and turning it inside out.
Step Four: Add "tea" to pouch and tie closed with a ribbon.
Step Five: Add to hot bath for a gentle, fragrant, all-natural treat.
Floral Bath Bomb
1 cup baking soda
1 cup citric acid
1 cup cornstarch
1 cup sea, Epsom or table salt
1 cup dried herbs or flowers or loose tea (mint, lavender, chamomile, jasmine, or rose are good choices and can be combined for original scents)
15 drops of essential oil
2+ tablespoons sesame, olive, or almond oil
2 teaspoons of water
Food coloring (optional)
Waxed paper
Molds: muffin tins, Easter egg, cookie cutters, etc.
Step One: Crush or powder dried flowers using a rolling pin or any other means necessary.
Step Two: Combine citric acid, baking soda, dried flowers, essential oil, optional food coloring and water in a large bowl.
Step Three: Stir and add the sesame, olive or almond oil slowly until the mixture clumps together and can be molded into a ball.
Step Four: Pack your molds very firmly and allow them to sit for several minutes.
Step Five: Once they have set in the molds, put them on waxed paper to dry for several hours.
Step Six: Tightly wrap in cellophane and tie with a ribbon for a refreshing gift or store in an airtight container.
Step Seven: Add to hot bath for a fun, relaxing indulgence.
Ginger Mint Body Scrub
1 cup brown sugar
1 cup sesame, olive, or almond oil
2 tablespoons of honey
Fresh ginger root, grated
Fresh mint leaves, chopped
Step One: Combine brown sugar and herbs in a medium bowl.
Step Two: Drizzle honey and oil into mixture and stir.
Step Three: Store in an airtight jar or container.
Step Four: Liberally apply to body, gently scrubbing skin several times a week to polish, rejuvenate and revitalize your complexion.
Honey Oatmeal Facemask
1 cup old fashioned, unflavored oatmeal
1 cup honey
Optional: A few drops of vitamin E oil
Step One: Combine ingredients in a medium bowl.
Step Two: Stir until it is an even consistency.
Step Three: Spread an even layer across face, let dry and rinse for a gentle, moisturizing solution to sensitive skin. Store remaining mask in an airtight container.
